Have you ever wondered what steps you need to take to migrate data from one Identity Provider to another? You’re not alone, we got you covered. While the details presented here are for the specific case of Forgerock to Cognito migration, the general idea remains the same for all migrations: extract, transform and load.
In this tutorial, we’ll walk you through the steps of migrating an existing Forgerock identity provider userbase to AWS Cognito. We’ll see how to extract the user data, transform it to meet our needs and then import it to a new Cognito user pool. We have a lot of ground to cover, so let’s get started.
Extract data from Forgerock
First off, we’ll need some users from Forgerock.
We can do an export with the following command:
//opt/opendj/bin/export-ldif --backendID myIdpId -l /tmp/my-export.ldif --propertiesFilePath /opt/opendj/puppet/admin.propertiesForgerock provides a lot of columns for the users but in this tutorial we’ll focus on the following ldif export:
mail: a@b.com
lastLogonDate: 20210928100138Z
userPassword: {PBKDF2SHA512}1000:z79l3JY9672YeXvZjY/zjW+c+JLse2cOV54VHjnEs0cnmy3Kwiiv/tTfCVQqtDSa1zmJN+PeI87vF1qzZ8dnM9o9sUBxHGvZ
userLanguage: en
origin: myOrigin
userCountry: NL
uid: 33a5f165-ae50-4c29-9927-f4e8da306edb
modifyTimestamp: 20211026061618Z
createTimestamp: 20200514122012Z
pwdChangedTime: 20200514122012.756Z
As you can see, the userPassword is not clear. We’ll come back to this later in this article
Create a DynamoDB table
In this table, we will store the users we exported from Forgerock. Since we don’t know the user passwords from the export, we’re going to use this dynamo table to store the user data, including the hashed password. We’ll also have to create a Lambda function to be able to check the hash at runtime. More on this later. For now, let’s create the dynamo table:
aws dynamodb create-table\
--table-name migrationTable\
--attribute-definitions AttributeName=email, AttributeType=S\
--key-schema AttributeName=email, KeyType=HASH\
--region eu-west-1
Transform to DynamoDB format
Now that we have the migrationTable created, we need to import the ldif data into our table. For this we used java, see below a rather large snippet of code:
Click to see code
      //define our dynamo object
      private static final AWSCredentialsProvider credentialsProvider =
            new AWSStaticCredentialsProvider(
                    //Client ID & Secret to be added
                    new BasicAWSCredentials("CLIENT_ID", "CLIENT_SECRET"));
      private static final AmazonDynamoDB dynamoDB =
            AmazonDynamoDBClientBuilder.standard().withCredentials(credentialsProvider).withRegion(Regions.EU_WEST_1).build();

      //insert in batches of 25
      TableWriteItems writeItems = new TableWriteItems(table.getTableName());
        int count = 0;
        int batchCount = 0;
        int batchSize = 25;
        ArrayList<Item> allItems = new ArrayList<>();
        while (ldifJsonIterator.hasNext()) {
            JSONObject ob = itr.next();
            if (validObject(ob)) {
                Item dynamoItem = getDynamoItem(ob);
                allItems.add(dynamoItem);
                if(count < batchSize) {
                    items.add(dynamoItem);
                    count++;
                } else {
                    int actualBatchSize = items.size();
                    writeItems.withItemsToPut(items);
                    getDynamo().batchWriteItem(writeItems);
                    items.clear();
                    writeItems = new TableWriteItems(table.getTableName());
                    count = 0;
                    batchCount++;
                    System.out.println("Inserted batch " + batchCount + " of " + actualBatchSize + " elements");
                }
            }
            itr.remove();
        }
So far we haven’t really done anything Cognito related, just preparation work. Now we get to the fun part.
While the export was fairly simple, there are a couple of steps we need to perform to ensure successful just in time migration.
Meaning that we will migrate the user at the moment he tries to log in.
The overall flow would look something like this:
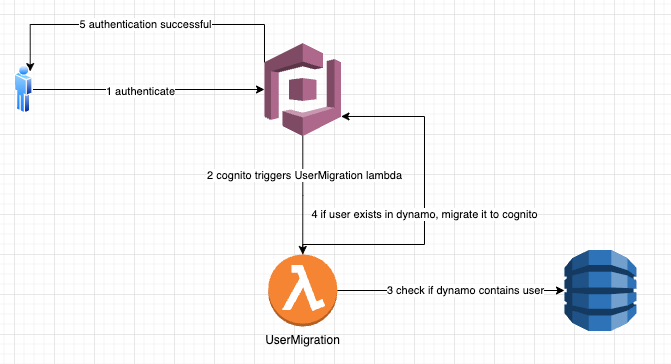
- Create a Cognito User Pool
- Add code that will do the migration(UserMigration Lambda function)
- Check that migration was done and users are able to log in
Let’s add some details on each of the steps.
Create a Cognito User Pool
This can be done in more ways, but we’ll use the aws ui to accomplish this. If you go through the steps to create a user pool, in the end you should reach to a screen that looks more or less like the following:
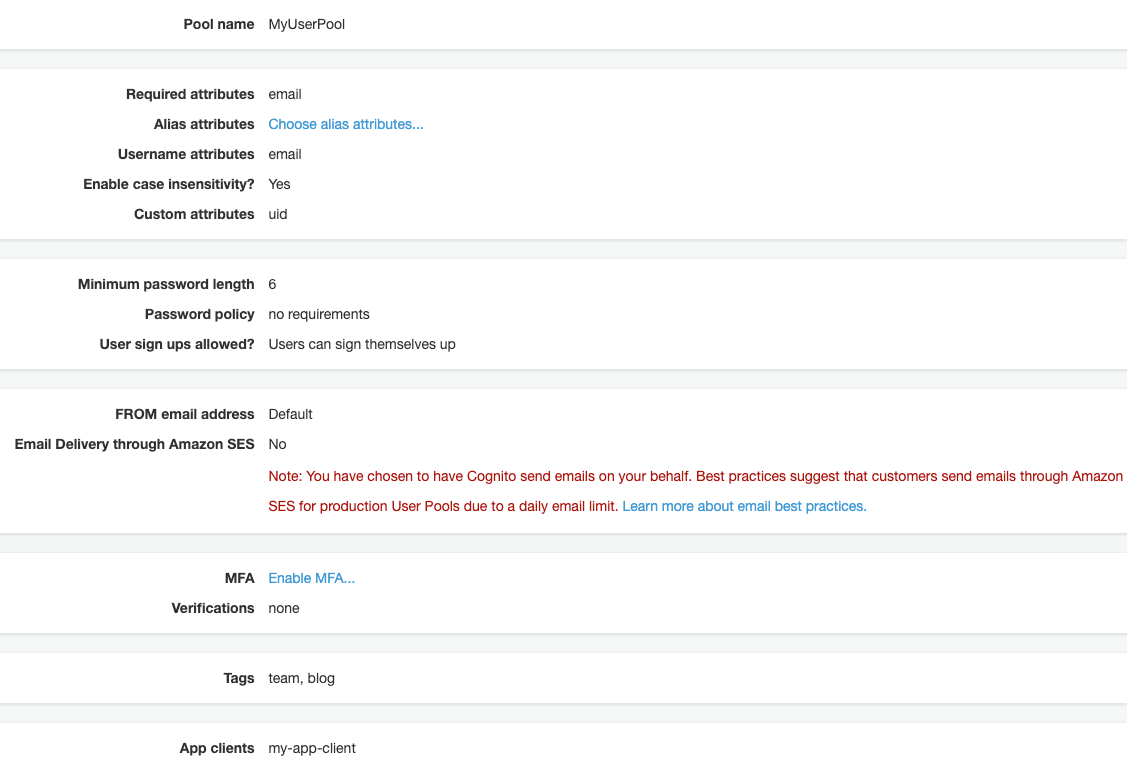
One interesting fact is that in the user pool you can add custom attributes. Let’s say that we need the uid from the old identity provider. We can add this custom attribute to our Cognito user pool with the following command:
aws cognito-idp add-custom-attributes --user-pool-id eu-west-1_aaaaaaaaa --custom-attributes Name="uid",AttributeDataType="String",DeveloperOnlyAttribute=false,Required=falseUser pool id can be taken from the aws cognito ui.
Great, now we have a user pool, which can have a custom attribute created when we do a user migration.
Load data using UserMigration Lambda
Now we need to create a function that will do the migration of the user from our dynamo table to the cognito user pool. Below is a snippet of the migration function:
    public CognitoUserPoolMigrateUserEvent handleRequest(CognitoUserPoolMigrateUserEvent event, Context context) {
        Map<String, AttributeValue> dynamoDBUser = dbClient.getItem(dynamoGetRequest).item();
        if (!dynamoDBUser.isEmpty()) {
            logger.log("User exists, migrating user");
            if (event.getTriggerSource().equals(USER_MIGRATION_AUTHENTICATION)) {
                if (passwordMatches(event.getRequest().getPassword(), dynamoDBUser)) {
                    setSignInCognitoEventResponse(event, dynamoDBUser);
                } else {
                    logger.log("User password doesn't match!");
                }
            }
        }
        return event;
    }
Check user migration
Great, we have everything set up, it’s time to test if the user is able to log in and if the migration is done properly. If all went well, you can go to your cognito pool App Client Settings and launch the Hosted UI. You should be presented with a screen like below:
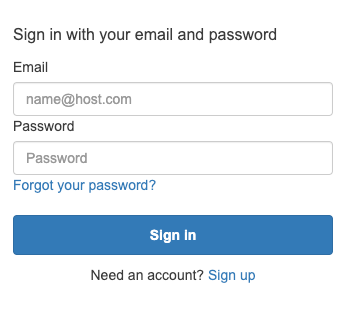
In this screen you need to enter a user/password combination that you have imported in the dynamo table. For our example, the hashed password is Password@123
Now, let’s go to the Users tab and check if our user was migrated.
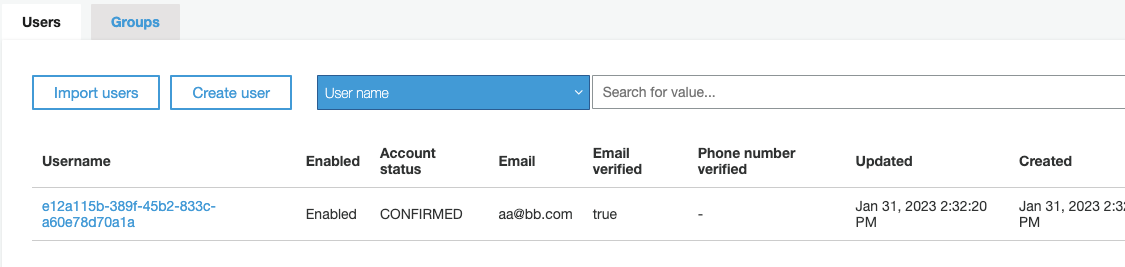
Seems all is in order. Now let’s check the details for the user, particularly, the custom uid attribute:
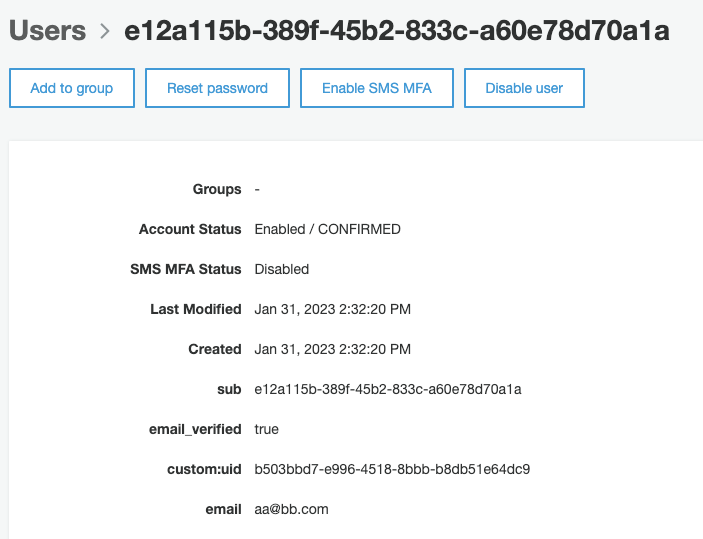
All seems in order, our custom attribute was imported successfully and the user is now managed by AWS Cognito.
One thing to point out is that the UserMigration Lambda will also run on subsequent user logins. With the current setup in place, we cannot tell when all users have been migrated. One approach to figure out which users have already been migrated is to set a flag in the dynamo table each time we migrate a user. That way when all users have been migrated, we can just remove the UserMigration lambda trigger.
 Mapping bridges, bridging mappers